In audio engineering, everything you hear is shaped by the journey a sound takes from its source to your ears. That journey is called the signal chain, and understanding it is one of the most important skills you can develop as an engineer, producer, or musician.
Whether you’re recording a vocal in a home studio, mixing a live band, or mastering a final track, the quality of your work depends on how well you control the signal at every step. In this guide, we’ll break down the components of a signal chain, explain how they interact, and share practical tips for keeping your audio clean and consistent.
What Is a Signal Chain?
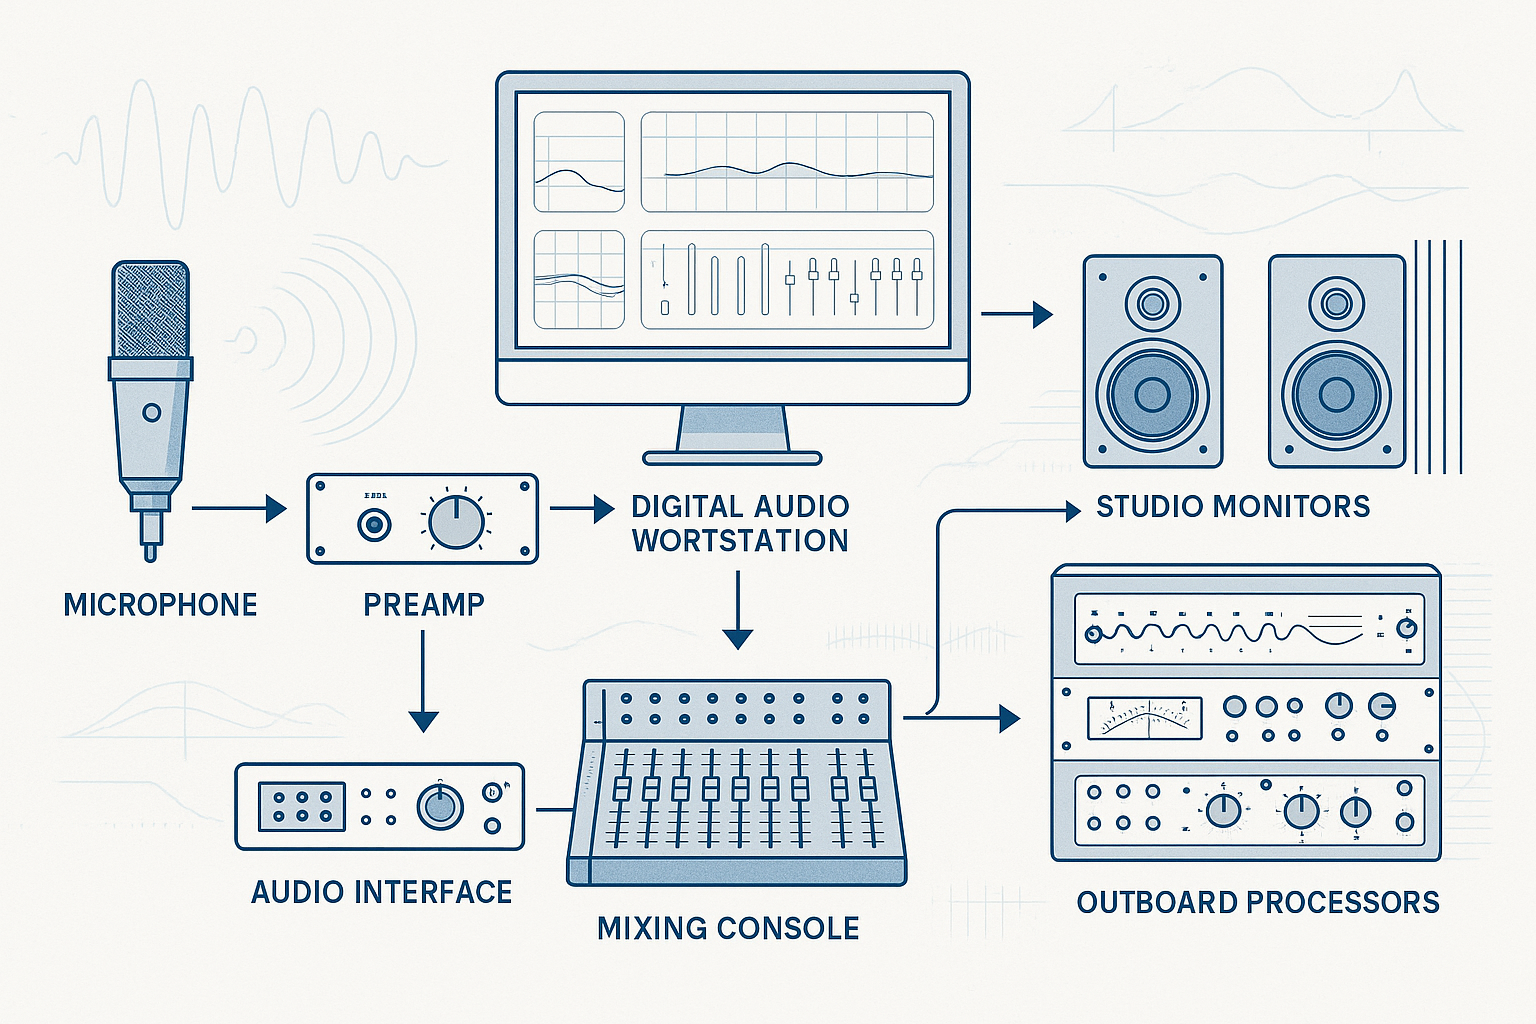
A signal chain is the sequence of devices or processes that an audio signal passes through, from the sound source to the final output. Think of it like a relay race: each stage hands the signal to the next, and the quality of the final result depends on every single hand-off.
Common Stages of a Signal Chain
While setups vary, most signal chains in music production or live sound include these core stages:
1. Sound Source
This could be anything — a singer, a guitar, a drum kit, a synth, or even a sample from your DAW. The better your source, the better your end result. You can’t “fix” poor tone later.
2. Microphone or Instrument Pickup
For acoustic sources, microphones capture sound and convert it to an electrical signal. Instrument pickups do the same for electric guitars and basses. Mic choice, placement, and technique make a huge difference here.
3. Preamp
A preamplifier boosts the mic or pickup’s low-level signal to line level, which is strong enough for processing and recording. High-quality preamps add clarity (and sometimes a pleasant tonal character).
4. Processors (Optional)
This is where you might shape the sound before recording, using:
-
EQ (equalization) to adjust tonal balance
-
Compression to control dynamics
-
Gates/Expanders to reduce noise
Hardware processors are common in studios, while plugins handle this in most DAWs.
5. Audio Interface / Converter
Your interface converts the analog signal to a digital one (A/D conversion) for recording into your DAW, and later converts it back to analog (D/A) for playback. Conversion quality impacts clarity and depth.
6. Digital Audio Workstation (DAW)
Your DAW is the hub for recording, editing, mixing, and sometimes mastering. Plugins here can include virtual EQs, compressors, reverbs, delays, and more.
7. Monitoring Chain
Your monitors, headphones, and amplifier (if separate) are the final stage before the sound reaches your ears. The accuracy of your monitoring setup determines how well you can judge your mixes.
The Golden Rule: Garbage In, Garbage Out
A signal chain is only as strong as its weakest link. If distortion, noise, or imbalance enters the chain early, it’s hard (or impossible) to fix later. That’s why professionals focus on getting the cleanest, best-sounding signal at the very start.
Best Practices for Maintaining a Clean Signal Chain
-
Match Levels Correctly – Avoid both clipping and overly low levels. Aim for healthy headroom.
-
Use Quality Cables and Connections – Bad cables can introduce noise and hum.
-
Minimize Unnecessary Processing – Don’t over-EQ or compress on the way in unless it’s intentional.
-
Gain Stage Properly – Balance the signal between each stage so you’re not overdriving one device and underfeeding the next.
-
Keep the Signal Path Simple – More devices mean more opportunities for noise or tone loss. Use only what’s needed.
Example: A Home Studio Vocal Signal Chain
A simple, clean chain for recording vocals might look like this:
Vocalist → Condenser Microphone → Audio Interface (with built-in preamp) → DAW (EQ, Compression plugins) → Studio Monitors
If you want to add analog flavor, you could insert an external hardware preamp or compressor before the interface.
Example: A Live Guitar Signal Chain
Guitar → Tuner Pedal → Overdrive Pedal → Delay Pedal → Amp → Mic on Amp → Mixing Console → PA Speakers
Here, pedal order matters, and every device in the chain shapes the tone.
Understanding your signal chain lets you make smarter decisions at every step — whether that means upgrading a mic, optimizing gain staging, or rethinking your processing order.
Once you know how each link in the chain affects the sound, you can troubleshoot faster, capture cleaner recordings, and create mixes that translate well everywhere.
If you want your final master to reflect every bit of that quality, send me your mix and I’ll make sure the last step in your chain is as strong as the first.